
Why is my Camera taking Crummy Pictures – Part 1
Part 1 of a 3 Part Series
How Your Camera’s Exposure Works
If you’re into renovating or working on your home the chances are good that you’ve taken pictures of your projects at some point. You may have found that sometimes your pictures are overall too dark or too bright or, more likely, that parts of them are too dark or too bright.
This post explains how your camera takes in, processes and exposes light. Other posts in this series:


In Part 3 of this series – ‘How to Take Better Pictures with your iPhone,’ I explain how to fix or prevent both exposure and color issues.
In case you haven’t stopped by my About page, this is a good place to mention that I spent 16 years as a professional photographer, so I know a thing or two (gee, that sounds like a Farmer’s Insurance Ad LOL) about taking pictures. And I’ve had a lot of practice in the last two years with my iPhone, which has been my exclusive camera since I retired.
My camera – for this tutorial, I’m using an iPhone (7 plus to be specific). The principles I describe here can apply to virtually any camera. But, if I provide specific instructions, they may apply to the iPhone in general or iPhone7 specifically.
DISCLAIMER: I’m not photographing for House & Garden and I’m assuming that you aren’t, either. The tips here are intended solely for the amateur who wants to take better pictures as cost effectively as possible, with the equipment you already have close at hand. If you’re interested in more serious real estate photography, I’ll happily point you in a few additional directions for more advice – just drop me a note!
First, a Few Definitions
Exposure
Exposure is the process that happens when light enters your camera through the aperture, hits a sensor and results in an image. Three things go into this process:
- Aperture (the space in your camera through which light passes)
- Shutter Speed (how long the camera’s shutter takes to open and close)
- ISO (stands for the International Organization of Standardization, and measures the sensitivity of your camera’s image sensor)
Each of these can be manually changed on the iPhone (and many other) cameras. But, for this tutorial, I’m going to talk about aperture only and will assume that your iPhone will use defaults for shutter speed and ISO.
Perfect Exposure
There is really no such thing, it’s more personal taste and there’s also the matter of artistic license and the desire to create a certain mood in a photo. So there’s a lot of leverage.
Technically though, a good, balanced exposure has visible detail in every part of the image, from the brightest to the darkest part. If something in a photo is either overexposed (also called ‘blown out’), or underexposed (too dark) there is little to no detail in those areas. So making sure there is detail throughout is a good baseline.
Range of Light
There are 3 words to describe the range of light in a photo:
- Highlights – where the most light is
- Shadows – where the least light is
- Midtones – everything in between
Why your Camera isn’t Exposing Properly
It’s the way cameras meter. A camera expects a scene to be evently lit. Technically, it expects a scene to average out to a mid-grey (also known as an 18% grey) tone.
- When a scene is evenly lit, most cameras today do a good job metering and you get an evenly or well exposed image.
- When a scene isn’t evenly lit, that’s when the camera gets the exposure wrong. And that happens a lot. Your eye can compensate when part of a scene is overly bright, but a camera can’t expose different parts of an image differently. It can only meter the whole image at once.
Check out the following examples:
Example 1
If part of your scene is a lot brighter than everything else, your camera will try to expose the highlights as mid-grey. This results in underexposing the rest of the image, thus making most of it too dark.
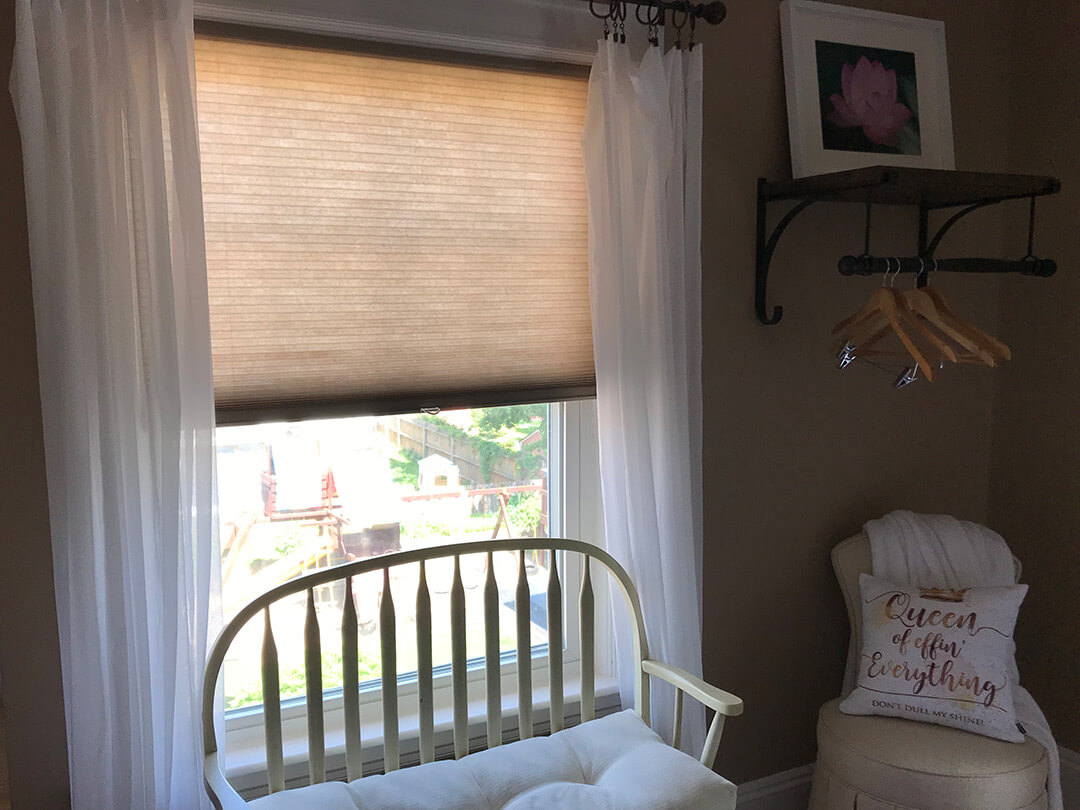
For the image below I basically just pointed and took a picture. When the camera metered the scene, it tried to make the window (which is much brighter than the rest of the picture) mid grey and therefore made everything else darker.
Because I didn’t meter specifically for the window, though, it’s still a little too bright and at the same time everything else is, again, too dark.
Example 2
In the next image I ‘told’ the camera (you can do that with an iPhone) to specifically meter the window so it would be mid-grey.
Therefore, it didn’t over-expose the window at all. But the cost of doing this was that the camera brought the exposure down even lower overall than the previous image. This made the rest of the picture even darker.

Example 3
In the next image I ‘told’ the camera to specifically meter the wall so it would be mid-grey.
So, it properly exposed the entire room except the window, which it really overexposed. That happened because it raised the overall exposure to properly expose the wall.
Once you over-expose something, there isn’t any detail in it so you can’t ‘fix it’ in post processing. Unless overexposing is a deliberate, artistic decision, it’s not a good thing.
Example 4
For the next picture I used the same scene, but moved myself forward and filled the frame with just the window.
The overall scene became more evenly lit because it’s just the window I’m taking a picture of. And the window itself has the same lighting, end to end. So the camera creates a proper exposure.
This scene is bright but it’s evenly bright and the camera likes even light.

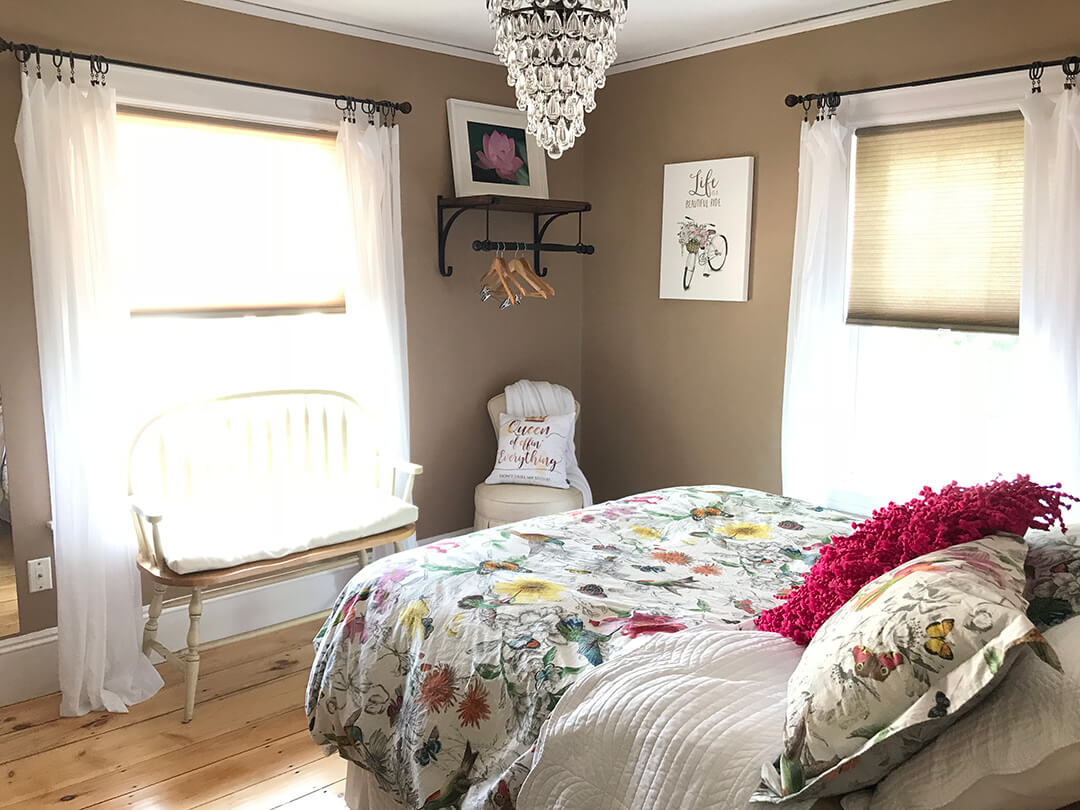
Example 5
The next picture is a different scene entirely, it’s of the bed in my master bedroom. Again, everything you see has pretty much the same lighting so the camera creates a good exposure. Nothing too dark and nothing too bright, just even light end-to-end.

Summary
When you have even lighting, it’s much easier to get good exposures.
But when part of your scene is very bright or very dark, you can’t depend on pointing and shooting to get you the image you want. In this instance, you need to help your camera out a bit. I write all about how you can do this in my Part 3 post, How to Take Better Pictures.
How about you?
Do you have a favorite iPhone tip? I’d love to hear about it. Please share in the comments below!
For more information
- View Part 2 of this series, How Your Camera White Balances
- View Part 3 of this series, How to Take Better Pictures with your iPhone
https://waterfallmagazine.com
Hi, just wanted to say, I loved this blog post.
It was practical. Keep on posting!
Wow, thanks so much, I really appreciate your checking in.