
Protect Yourself with our 10 Comprehensive DIY Safety Tips
According to Home Safety Council, of the 43 million DIYers taking on projects, 1 in 5 wind up in the hospital every year. That’s almost 9 million people, and most of the accidents are deemed ‘preventable.’
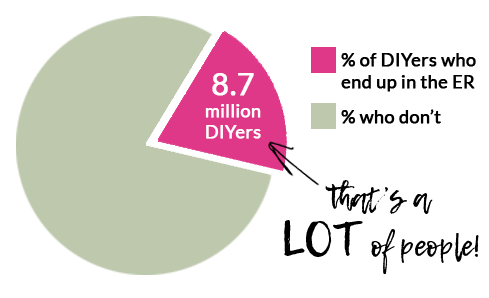
1 in 5 in the hospital. Let that sink in.
That doesn’t take into account all the injuries that didn’t make it to the hospital – the smaller cuts, bruises, shocks and sprains (and everything else).
Oh, and for 4 of you out there, you’re safe.
I was the 1 back in September. Not really an injury but a vascular issue related to too much time on a ladder with the wrong shoes (new safety rule!)
The Details
Most accidents include:
Ladders – #1
Tools (power or manual) – #2
Exposure to toxic fumes – #3
The accidents can happen during any project, big or small, they don’t discriminate.
Most accidents happen when people either overestimate their abilities or don’t pay enough attention.
This is all leading to – you guessed it! Safety is nothing to take for granted.
The following tips are my accumulation of things that have kept us safe (oops except for that one event) during our own house projects.
1. Know Your House
True Story: this happened to me in a prior house many years ago when a pipe burst. I opened my garage door to find hot water spraying through thousands of tiny holes from the garage roof onto my car.
That noise I had heard the week before suddenly made sense.
I didn’t know where the water shut-off was, though, and it took an eternity to find someone who did.
As a result, there was more damage than there should have been. And I think the scare took a year off my life.
At least one of you (preferably both) should have a really good understanding of where things are in your house and how to use them or shut them off in case of emergency:
- shut off valves
- fuse box
- plumbing
- vents
- heater
- air conditioners
- meters

2. Be Up-to-date on Codes
That vent in the kitchen?
Best to make sure it snakes outside (2 day job) vs. back into the room (1 hour job). Yes, it happened to us. We considered the shorter route but we’re glad we took the time and did it right.
Do a little research, you really don’t want to have to re-do something later.

3. Protect your Things
I’m in awe at how far paint can splatter and the areas that dust can reach.
If you’re painting or generating dust at all, take the time to cover important items with drop cloths.
Or move them to another room entirely.
If you’re generating a ton of dust in a single room, get a sheet of cheap plastic and use blue tape seal the doorways to keep the dust in that room.
There’s nothing quite like having to dust everything in your entire house.
Yup, happened to me.

4. Protect Yourself
Wear the right clothing.
I now have 2 sets of ‘paint clothes’ that I use when working on the house.
- I don’t have to wonder what to wear.
- The clothes fit close so I don’t worry about catching a shirt on something (how DOES that happen?)
- My ‘work’ sneakers are comfortable and don’t slip.
- I wear sturdier shoes when I’m working on a ladder (new learning)
Some additional ‘protect yourself’ tips
✓ If you’re going to be spraying anything, trust that whatever you are spraying will find it’s way into wherever you don’t want it to go. Cover from head to toe.
✓ If there’s going to be excess noise, wear earplugs. Yeah, you really can lose your hearing from loud noises (just ask an aging rock star).
✓ Wear safety goggles or glasses when spraying, drilling, or sawing. The last thing you want to do is ‘put your eye out.’
✓ Avoid the #3 cause of DIY accidents – injury from fumes. Ventilate rooms when you’re painting or producing a lot of dust. We have our electric sander hooked up to our shop vac, which has saved us a lot of headaches.
✓ Make sure that your workplace is well-lit. This isn’t always easy to do, we now have a couple of mobile lights that give us sufficient light whatever the task.
✓ Keep first aid supplies handy. We’re super careful but even we occasionally have an oops and need a bandaid. You don’t want to hunt for one.
✓ Clean up with safe products.
✓ Buy a fire extinguisher and keep it handy.

5. Use Tools Correctly
But I have been lucky.
And I’ve seen the light. The older I get the more cautious I am and the healthier respect I have for tools of any kind.
Some tips for you
Most of these fall into the ‘goes without saying’ category but they’re still worth mentioning.
✓ Buy decent quality tools. If you buy cheap tools (trust me) you’ll be buying them again.
✓ It may be tempting to use a set of pliers like a hammer to save yourself from walking across the room, but you can damage the tool.
✓ Always use tools in accordance with the manufacturer’s warnings, precautions and instructions. Sorry I just had to say that.
✓ If you aren’t sure how to use a tool, get some instruction from someone who knows. Don’t guess.
✓ If you’re borrowing tools, inspect them for frayed power cords and cracked or broken casings. Fix anything that’s broken or don’t use it.
✓ Always check the switch on anything that’s powered to make sure it’s “OFF” before you plug it in.
✓ If there are safety guides on a tool, don’t remove them. They’re there for a reason.
✓ Unplug tools before leaving the room.
✓ Never leave an active power tool unattended.
6. Take Care of your Tools
✓ Don’t yank the cord when removing it from a receptacle.
✓ When disconnecting the cord, always grasp the plug, not the wire.
✓ Repair or discard damaged tools.
✓ Maintain your tools, keep blades sharpened and tighten any loose parts.
✓ Protect your tools from moisture.
✓ Keep a thin coating of oil on metal parts.
✓ Always store tools out of a child or pet’s reach when they aren’t in use.

7. Be Safe on Ladders
No surprise here that ladders are an injury magnet. I am not a fan of heights.
Movie shots taken from an aerial view make me sweat. Putting myself any higher than 2 feet off the ground sends a shiver straight up my spine. And it’s not a happy feeling.
I am so out of my comfort zone on a ladder that it’s easy for me to be vigilant.
Maybe that’s a good thing.
The sad truth is that there’s no such thing as an absolutely safe ladder.
But, there are still some things you can do to keep yourself safer on them:
✓ Invest in a decent ladder, one that has rungs that you can rest your entire foot on and that’s stable.
✓ Wear sturdy shoes that won’t allow your feet to curl around the rungs if you’re spending a lot of time on a ladder. A recent learning for me.
✓ Make sure the ladder has feet that won’t slip.
✓ Aluminum ladders are certainly lighter and easier to carry around. That’s a plus.
✓ Always open a stepladder to its fullest position (double check), lock the braces on each side in place, and pull down the bucket shelf if there is one.
✓ In placing a ladder, use the 4-to-1 rule. For every four feet of ladder, the bottom part should be one foot away from the wall or space it’s leaning against. That’s about a 75 percent incline. I read this rule almost everywhere.
✓ Always pay attention to ladder length: use a ladder long enough for the task.
✓ Don’t balance the ladder on anything except the floor or ground
✓ Make sure the ladder is steady before you head up.
✓ When on the ladder, don’t go higher than the third step from the top.
✓ Whether you are going up or coming down, always face the ladder head-on, and use both hands to hold onto the side rails or rungs.
✓ If you’re working in front of a door, lock it or make darn sure no one can come through.
✓ Don’t go up or down the ladder with tools in your hands. Maybe one small one.
✓ Look down before you head down. My sister put her foot directly into a can of paint once when she was descending a ladder. Made for a good story but I don’t think she was too happy at the time.

8. Be Aware of Others Around You
✓ If you’re working behind a closed door, lock it. There’s nothing like having a door hit you in the head while you’re super focused on painting the other side of it.
✓ Keep children and pets away from tools and projects.

9. Respect the Heck out of Electricity and Gas
I’ll bet that got your attention. Personally, I don’t ever cut corners in this area.
True Story
I get pretty nervous around both electricity and gas. When Dom was connecting the gas back up to our stove during our kitchen remodel, I actually left the house and stood on the porch.
If something happened, I wanted to be sure someone in the family survived.
When I came back inside Dom mentioned that the porch probably wasn’t far enough, I should have been standing in the street. Good thing it all went well LOL.
✓ Never work on an electrical circuit that is live. Trip the circuit breaker for where you’re working, trip the whole house if you have to.
✓ Don’t stand on an aluminum ladder when working with electricity.
✓ Water and electricity don’t mix.
✓ Use a voltage meter to test whether there’s any live current where you are working. We carry one with us all the time.
✓ If you’re working with a lamp, check the size of the bulb that the lamp will support and don’t use bulbs that are a higher wattage than manufacturer’s suggestion.
✓ Carefully check all loose wires for damage and repair or replace them.
✓ We have a gas oven so similar rules apply to gas. Always, always be sure that the gas has been turned off before working on a gas line. And make sure that gas lines have no leaks. If you’re just an observer and you’re nervous, be sure to stand far enough away that you don’t get taken out by the blast 😀
✓ With both electrical and gas, if you aren’t 1000% sure of what you are doing, call in a professional.

10. Don't Cut Corners with Safety
Focus
Here’s some trivia for you – when accidents usually occur
The majority of construction worker injuries occur on Monday between 8 and Noon.
If you’re doing remodeling on the weekends, the timing probably translates to your Saturday morning. That’s when you’re feeling all gung ho and ready for anything. And maybe you dive right in and don’t make the most safety-conscious decisions.
So, whenever you START a project don’t forget to take a minute and FOCUS.
Don’t Over-Extend
We’re almost always careful not to extend ourselves beyond our capabilities no matter what we’re doing.
Maybe that’s just wisdom that comes with age. More likely it’s the knowledge that a fall when you’re 60 or 70 can carry more consequences than when you’re 30.
Accidents are always something to avoid at any age, though, so taking an extra minute to be sure that you’re secure is a good thing.
Don’t Juggle too much
Assume that you really can’t safely juggle more than 2 (OK maybe 3 if they’re small) things.
If you need to go down the ladder twice because you have more to carry than you can safely manage, make the second trip.
If you need to take 3 trips from point A to point B because you have too much to carry, take 3 trips. Avoid a drop or a fall.
Don’t Work Tired
Which brings us to quitting time.
We usually try to finish projects by around 3 or 4 pm so we have a couple of hours to clean up ourselves and our space.
A clean space is a happy space!
And, it serves as a great springboard for the next day. Quitting at a reasonable time also ensures that we’re not working when we’re tired, because that’s a recipe for disaster.
So quit before you’re tired and leave your workspace in good shape, so you can be back and ready to work the next day!
For more information
To see how we put safety to use, view all our house projects by visiting our Tour My House page.
How about you?
Got any other safety tips I forgot to list? I’d love to hear from you in the comments below!